Low-light cameras like the Sony A7S and Canon C300 have been opening up incredible possibilities for shooting night exterior scenes without any lights at all. But there are still some huge advantages to shooting day for night which can make it an ideal choice for many filmmakers. So for those of you that are looking to go down that path, this article will detail exactly how to do it right.
Shooting day for night (for those of you that don’t know) is quite literally the practice of shooting during the day with the intention of making your footage look like it was shot at night. There is no exact science to this process, and there are several different approaches that can be employed in order to achieve a day for night effect. The technique is constantly used on films of all shapes and sizes, and has been one of Hollywood’s favorite tricks of the trade for years. Films like Castaway, Lawrence of Arabia, Mad Max: Fury Road and countless others have been able to nail down a realistic day for night effect without the audience ever second guessing it.
Before the advent of digital color grading platforms and compositing tools, many day for night sequences were captured in camera. A combination of filters (usually an ND, Polarizer, and a Day For Night filter) would be used to underexpose the image, while also giving it a slight color cast to help sell the effect. More specifically, the ND filter would simply knock down the exposure, while the Polarizer would help to manage hot spots in the sky, reflections, and other surfaces that could be giveaways. Day For Night filters would often be used as a means to cut out certain colors (red in particular) so that the footage would shift to a cooler color palette, which is more consistent with moon light.
Today, the cameras we shoot on and the software we have at our disposal make it easier than ever to capture day for night scenes. Certain fundamentals haven’t changed at all (such as backlighting your subjects, and other techniques that we’ll get into below), but the methods in which we employ those techniques have shifted in some ways.
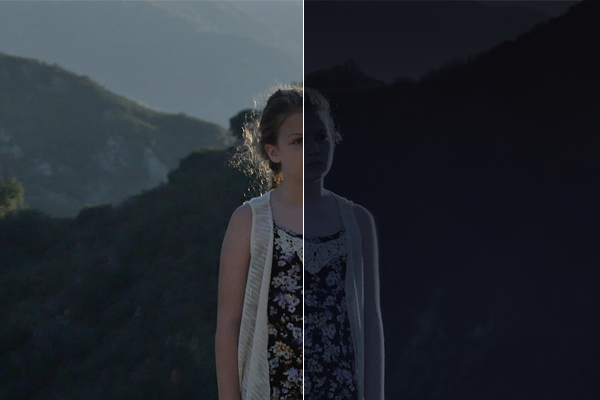
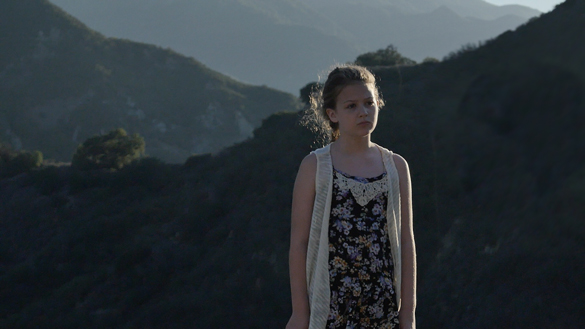
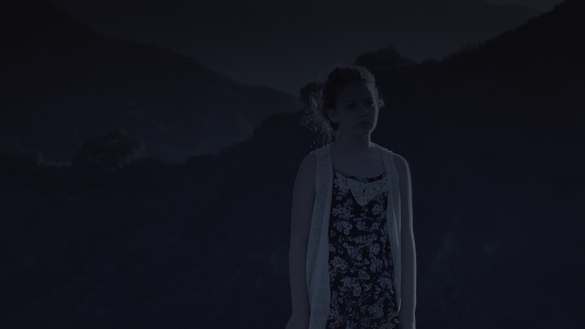
Below is a quick example of a day for night shot that I recently captured on a small music video shoot. The grade on the bottom shot isn’t final, but it should still give you a rough idea of what’s possible with just some quick tweaks in the editing room:
So without further ado, here are my top 5 tips for day for night cinematography:
1. Backlight your subjects
Now that we’re able to accomplish so much in post, our lives on set are a little easier with regards to day for night footage. Even still, the lighting of your subjects is still the number one variable to be aware of on set, and can easily make or break your shot.
If you’re shooting in the middle of the day with the sun overhead, your subjects are likely going to have really hard shadows on their faces. This is always a dead giveaway of a day for night shot, as moonlight wouldn’t typically cast those types of shadows. This doesn’t mean you can’t shoot during the day, but it does mean you need to position your talent with their backs to the sun so that you avoid those nasty shadows. By backlighting them, you are effectively creating a nice rim light on the talent that can easily be cheated to look to like moon light once the shot is color graded.
2. Shoot during golden hour
While you can always choose to backlight your subjects when shooting in the middle of the day, an even better option would be to shoot at golden hour or blue hour (the hour before sunset and the half hour after sunset). At this time of day the quality of light is nearly perfect for day for night shots, and the light quality is very soft and flattering. Not to mention, you don’t need to worry about fighting those harsh shadows on your talent.
Another benefit to shooting at golden hour is that practical light sources (such as headlights, streetlights, etc.) will pick up well on camera. This means that even once you darken the footage in post, those practical lights will still stand out and help to add realism to the overall look.
Color grading golden hour shots to look like night footage is typically much simpler than doing so with full daylight footage, but it does come with a couple of caveats. First off, since the sun will be so low on the horizon, you will still need to work around it when framing your shots so that you don’t accidentally catch the sun in your frame. Secondly, the low sunlight will cast long shadows on the ground around your talent, which you may or may not like… This is actually not an issue in my books (as moonlight can cast long shadows as well), however some people aren’t as fond of that look as others. If you fall in the latter camp, always be cognizant of how you frame up your shots in order to avoid those long shadows on the ground.
3. Use a polarizer
Although you no longer really need a Day For Night filter (or even an ND for that matter) to capture day for night shots, I would always still recommend using a Polarizer. As I mentioned earlier, whenever you catch a glimpse of the sky, a reflection off of water or numerous other surfaces, you will want to be using a Polarizer to cut out the reflective glare and give you a more authentic night-time looking scene.
Simply pop a Polarizer on your lens and leave it on for the duration of your shoot. It’s never going to hurt your footage, and will only help to eliminate unwanted glare that could give away your day for night effect. It will also help to knock down your exposure just a touch which can’t hurt either. Typically, I don’t recommend underexposing too heavily in camera (since you can pull your levels way down in post), but it’s still good practice to very slightly underexpose your shots to prevent any highlight clipping on your talent. which again could give away the effect.
4. Understand when you can show the sky
In the past, many filmmakers would highly advise against ever showing the sky when shooting day for night, but personally I don’t think you always have to hide it. There are some obvious situations where it will be a dead giveaway (for instance when the sun is literally in the shot, or when the sky is completely blown out), but in many cases you can actually get away with showing a bit of sky.
The key is knowing when and where you can get away with it, and having some solid abilities in the color suite (more on that below). Typically, during blue hour you are pretty safe as the color and luminance of the sky is already getting pretty close to night time. The same goes for heavily overcast days, as your talent may not be too far off exposure-wise from your background. The real issue occurs when the luminance of the sky is drastically brighter than your talent, which makes it obvious that you are shooting day for night. In those extreme cases, simply frame out the sky or opt to shoot at a slightly earlier or later time of day, and you’ll be just fine.
5. Be prepared for a heavy color grade
So much of achieving a realistic day for night look relies on the post-processing/color grading of your footage. Really, this last bullet point could be an entire article itself, but for the purpose of this post I’ll just touch on the basics.
There are four main steps that I always take when color grading day for night footage:
1. I always start by adjusting my exposure levels and bringing down my highlights as much as possible, before doing any other color work. Typically I will bring the highlights down to the point where the skintones are just visible enough that you don’t need to strain your eyes to see the talent. From there, I might raise up the midtones to bring back some of the shadow detail that would inevitably get lost after reducing the highlights. That will get my exposure most of the way there, but will sometimes leave me with an image that is a bit too flat for my liking. If that’s the case, I’ll crush the shadows back down just a touch to bring back some contrast.
2. My next step is adjusting the color and saturation. The specifics of this step will vary from shot to shot, but 90% of the time it will involve pushing blue/magenta into the highlights and the shadows and then desaturating the entire image. This will now leave me with an image that is nice and cool, but not too saturated that it looks overly vibrant. The cool tones tend to work really well with the underexposed footage, and after this step the image starts to really come together and look semi-realistic.
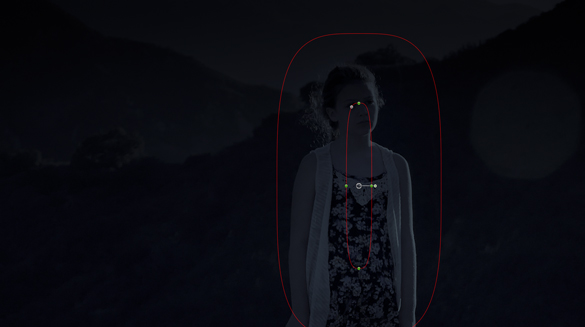
3. At this stage I’ll use multiple power windows to help re-light my shot in post. If there is any bit of sky showing, I’ll create a gradient/power window that will knock down the exposure of the sky significantly. The same goes for the background in general, even if the sky isn’t showing. It’s quite common for one power window to leave an undesired effect on another part of the image (for instance the power window on the sky might bleed over to the talent), so in that case I will use another power window to combat that issue. As you can see in the screenshot below, I am using a power window to bring back some detail on the talent since the power window on the background was so strong.
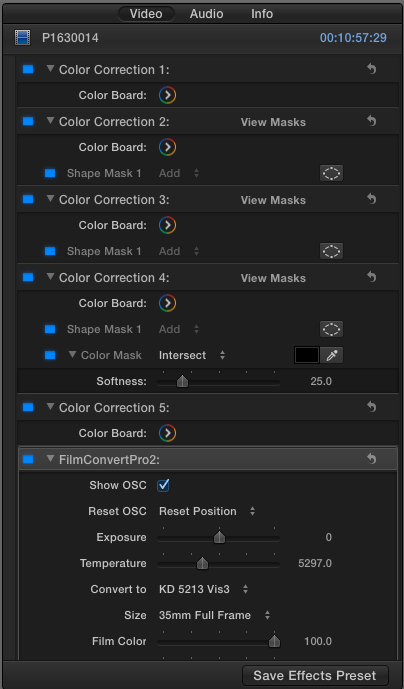
4. Once all of the windows are in place and the levels/color have been dialled in, I’ll move on to the final step – film emulation. Much like compositing in After Effects, I feel that adding an “adjustment layer” or in this case some film emulation, helps immensely in tying everything together. Any discrepancies in color, exposure, windows, etc. are quickly mitigated once film emulation is used to blend everything together. Personally, I love using Film Convert as it is one of the simplest and most powerful tools I have ever used for achieving beautiful and realistic film emulation.
While I would normally color an intricate day for night shot in DaVinci Resolve, I sometimes will use FCP X or Premiere and color directly in the software out of necessity (usually due to lack of time). In the example shot at the top of this article, I used FCP X. Here is a screenshot of what my inspector looked like with all the grades/Film Convert on it:
Final Thoughts
Day for night is still an extremely relevant option when it comes to crafting night scenes. While it may be tempting to simply grab an A7S and shoot in actual moonlight, doing so isn’t always ideal. For starters, there’s something to be said about shooting during the day and keeping your cast/crew happy. But even on a technical level, you can often achieve superior results by shooting proper day for night footage, as opposed to bumping up your ISO to ridiculous levels… In my opinion at least. With day for night you don’t need to worry about excess noise/grain in your footage, your colors won’t look overly synthetic, and you may have access to locations that would otherwise be inaccessible at night.
There’s a time and a place to shoot day for night, just as there’s a time and place to use a high sensitivity camera at night. Neither option is a substitute for actually shooting at night with proper lighting setups, but when you’re in a pinch it’s always best to know your options.
For more articles like this, be sure to subscribe to the newsletter on the right panel of this page.
And be sure to follow me on Instagram, Facebook, and Twitter for more updates!


7 Comments
Christopher Sieber
atInteresting, have many thanks.
Which lamps do you use for night scenes, like which color temperature?
Cinematography Research – Nattan Ralph
at[…] Nattan Ralph Uncategorized 25th Apr 2022 1 Minute 5 Easy Tips For Achieving Excellent Day For Night Shots On Set And In Post […]
Chris Chisnall
atJust about to shoot day for night in a forest. I can’t shoot at night for various reasons but I think this is a good location to do it because of the tree canopy obscuring much of the sky. Thank you for some great advice about the grade here, I intend to use Arrimax 18s as backlight and a 20×20 silk fill to get some contrast back in.
Noam Kroll
atAmazing, hope it goes well!
Mise-en-scene (Lecture notes and research) – Rachel Oliver Learning Journal
at[…] N (2015) 5 Easy Tips For Achieving Excellent Day For Night Shots On Set And In Post. Available at: https://noamkroll.com/5-easy-tips-for-achieving-excellent-day-for-night-shots-on-set-and-in-post/ [Accessed: […]
Lighting examples – Lucy Barugh learning journal
at[…] Day For Night Shots On Set And In Post. Noam Kroll.14 August 2015 [Online] Available from: https://noamkroll.com/5-easy-tips-for-achieving-excellent-day-for-night-shots-on-set-and-in-post/ [Accessed: 26 November […]
Color Grading Tutorial: Creating A Day For Night Look – ideafolders.com
at[…] I wrote a whole article on Day For Night production considerations, which can you read as a starting… […]
Color Grading Tutorial: Creating A Day For Night Look - Noam Kroll
at[…] I wrote a whole article on Day For Night production considerations, which can you read as a starting… […]
jay
atjust about to shoot a dark sci-fi in liverpool, england and we need the darkness, but are limited with crew time, trying to nail 10 pages a day sometimes, so time is of then essence big time.
Whats your thoughts to nailing a car chase scene in the light, or virtually dark?
Noam Kroll
atFigure out how to make the scene as simple as possible with as little coverage as possible. Use that limitation to make the film even better, and not look like it’s lacking something. Hope that helps 🙂
Attention, Filmmakers: 5 Easy Tips for Achieving Day for Night | CINVOX
at[…] post originally appeared on Noam Kroll’s blog and appears here with his permission. Follow him on Instagram, Facebook and […]
Dylan
atGreat information as always Noam. This will be really helpful for a campsite shoot I have this weekend. Thank you!
Noam Kroll
atGlad to hear it!