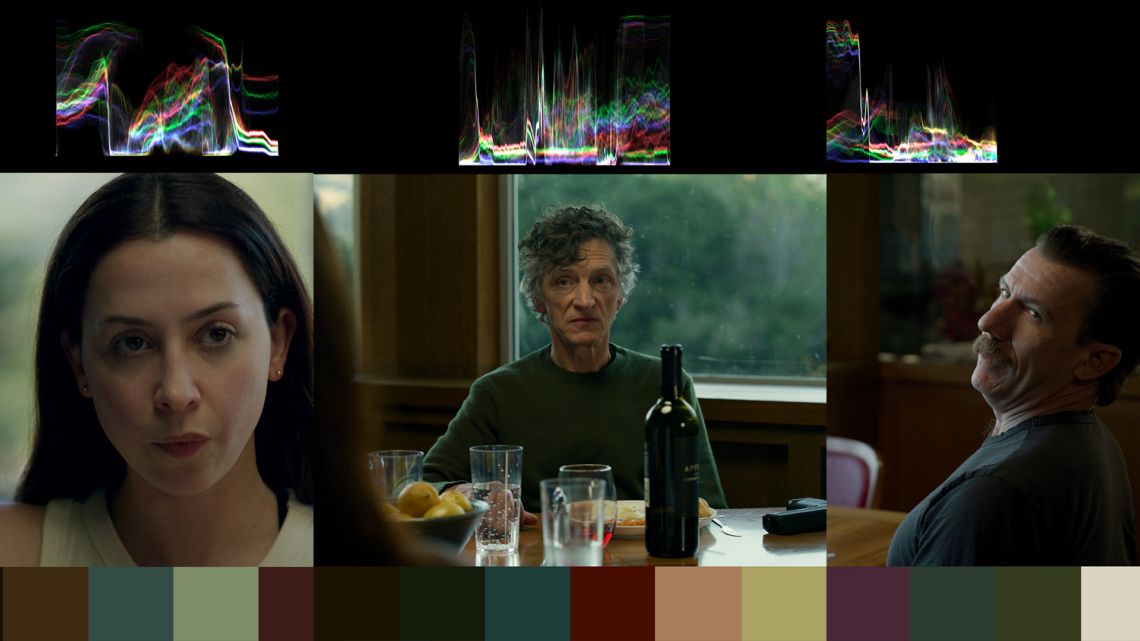

This week I’m putting the final touches on my latest short film, Jack & Christine – and am approaching the color grade in a very minimal way.
I thought I would share a bit on this process and my philosophy behind it, because many filmmakers find themselves overwhelmed by color and tend to overcomplicate things in the process.
Having spent well over a decade working with DaVinci Resolve (nearly every day), I fully understand how incredible the software is. And how many powerful tools it has under the hood.
But after applying countless power windows, trackers, secondaries, color keys and other advanced methods, I’m now finding myself drawn to a much more minimalistic approach.
It’s what I might call a digital film bath. And it’s a process you can achieve in any software using even the most basic color tools.
In the analog film days, you were severely limited in how you could process and render colors. Especially compared to today’s standards.
Yet some of the best images ever committed to film existed well before any of the cutting edge tools we have today. Even before non-linear editing on computers existed at all!
These films relied more on getting the right look in-camera (using a carefully selected film stock), and then processing it with chemicals during the color timing phase.
A very limited amount of options were on the table. You could choose from a handful of different raw film stocks, some experimental processing methods (like tinting or bleach bypass), and other tactics like push / pull processing to affect the exposure.
But once that was done, the colors were baked in and the film had its look. There was no drawn out process of micro-managing every shot, and over-cooking the footage with thousands of isolated adjustments.
Don’t get me wrong, it’s great that we have access to the tools that we do today. If you need to clean up problematic footage or do something very specific for a commercial grade, the advanced methods are invaluable.
That said, if you are a fan of a more timeless, simple, analog-like aesthetic – there are really only 3 things you need to focus on:
1. Getting the right look in camera. Too many filmmakers now are afraid to make bold choices on set, instead opting to play it safe and give themselves “options in post.” More often than not though, this only creates a more convoluted post process and more generic grades.
2. Basic primaries adjustments. If you captured the right look on set, a couple of very basic corrections / adjustments to contrast, color balance, and saturation can completely transform and enhance the aesthetic. At this stage it’s about getting a consistent look across the entire film.
3. Additional look development. Once all the footage is balanced and matched, I like to apply a blanket look to everything to tie it all together. This is the equivalent of adding a warming or cooling filter to the lens, only it happens digitally at the end of the pipeline.
Once those three steps are done, so is the grade.
If you really need to, you can always go in and use masks to fine tune details, add vignettes, or isolate skin tones. And there’s nothing wrong with taking full advantage of those tools.
But if you’re not super advanced on the color side (but still want to achieve really nice palettes), know that you can achieve incredible results without overcomplicating the process for yourself.
The most important tool you have is your eye.
If you’ve trained it right, you will know what to look for on set, and how to enhance it in post even with the most basic of tools.
For exclusive filmmaking articles every Sunday, sign up for my newsletter here!



54 Comments
https://kling4.tv
at“A Simpler Approach To Color Grading” is easy to follow thanks to how concrete the examples are. Kling 4.0 guides a clip with up to 15 reference assets and 10 keyframes, then outputs it in 4K: https://kling4.tv
https://seedance2-5.com
atHearing that someone with daily Resolve experience is stepping back from trackers and secondaries makes a minimal grade feel earned rather than lazy. The analog processing limit is a good reminder that constraint can shape taste more than another tracker. For a short film clip, https://seedance2-5.com could handle the video editing without adding extra clutter.
Seedance 2.5 AI video generator
atThe “digital film bath” idea is refreshing, especially after hearing how many power windows and trackers used to pile up. It makes sense that a restrained grade can carry more mood than a stack of nodes. Even with tools like Seedance 2.5 AI video generator offering video editing for short clips, the real lesson is knowing when to stop.
chloe
atLeaving options for post need not mean settling for a generic grade. Even within your three-step approach, a bold look chosen on set deserves some restraint if it makes matching shots harder before the blanket look is applied.
1
at555%2527%2522\’\”
1
at555′”
1'"
at555
1
at555
zFPWdwPk2m1OFASX') OR 797=(SELECT 797 FROM PG_SLEEP(15))--
at1
zFPWdwPk-1 waitfor delay '0:0:15' --
at1
zFPWdwPk0"XOR(if(now()=sysdate(),sleep(15),0))XOR"Z
at1
zFPWdwPk
at1’||DBMS_PIPE.RECEIVE_MESSAGE(CHR(98)||CHR(98)||CHR(98),15)||’
zFPWdwPk
at11Ebydr07′) OR 755=(SELECT 755 FROM PG_SLEEP(15))–
zFPWdwPk
at1-1) OR 247=(SELECT 247 FROM PG_SLEEP(15))–
zFPWdwPk
at1-1 waitfor delay ‘0:0:15’ —
zFPWdwPk
at(select(0)from(select(sleep(15)))v)/*’+(select(0)from(select(sleep(15)))v)+'”+(select(0)from(select(sleep(15)))v)+”*/
zFPWdwPk0'XOR(if(now()=sysdate(),sleep(15),0))XOR'Z
at1
zFPWdwPk
at555
zFPWdwPk
at1
zFPWdwPk
at1
zFPWdwPk
at1*if(now()=sysdate(),sleep(15),0)
zFPWdwPk
at1-1); waitfor delay ‘0:0:15’ —
zFPWdwPk0"XOR(if(now()=sysdate(),sleep(15),0))XOR"Z
at1
zFPWdwPkq6rQHzY7'; waitfor delay '0:0:15' --
at1
zFPWdwPkOJpD7tjf')) OR 211=(SELECT 211 FROM PG_SLEEP(15))--
at1
emailtoolbox
atNice write-up, I learned something here. Your take on “Simpler Approach To Color Grading Noam” especially resonated. It pairs well with an automotive brand index I use regularly: an automotive brand index Anyway, thanks again for the content!
zFPWdwPk
at555
zFPWdwPk'"
at555
zFPWdwPk
at555′”
Henry
atStrong interviews start by identifying which claims actually need validation, then turning those claims into specific follow-up prompts. A useful question asks for context, the candidate’s personal contribution, the decision they made, and evidence of the outcome. This keeps the discussion focused without making it feel like a cross-examination. RoleProbe is built around that practical sequence: connect the role requirements to resume claims, define answer signals, and note what evidence would clarify an ambiguous answer.
zFPWdwPk
at1
zFPWdwPk
at1*if(now()=sysdate(),sleep(15),0)
zFPWdwPk
at(select(0)from(select(sleep(15)))v)/*’+(select(0)from(select(sleep(15)))v)+'”+(select(0)from(select(sleep(15)))v)+”*/
zFPWdwPk
at1-1 waitfor delay ‘0:0:15’ —
zFPWdwPk
at1MU9TcJb3′) OR 187=(SELECT 187 FROM PG_SLEEP(15))–
zFPWdwPk
at1’||DBMS_PIPE.RECEIVE_MESSAGE(CHR(98)||CHR(98)||CHR(98),15)||’
if(now()=sysdate(),sleep(15),0)
at1
zFPWdwPk-1 waitfor delay '0:0:15' --
at1
Guest Reader
atThanks for the clear explanation in A Simpler Approach To Color Grading – Noam Kroll. I found a complementary resource here: https://www.leddlp.com/.
Lysander Hawthorne
atMany endless runner games eventually become predictable, but slope game avoids that problem with its constantly changing layout. Even experienced players cannot rely entirely on memory, which means every session demands fresh attention and quick decision making from beginning to end.
zFPWdwPk
at1
zFPWdwPk
at555
zFPWdwPk'"
at555
zFPWdwPk
at555′”
Anonymous
at555
zFPWdwPk
at555%2527%2522\’\”
zFPWdwPk
at1*if(now()=sysdate(),sleep(15),0)
zFPWdwPk
at1-1)) OR 109=(SELECT 109 FROM PG_SLEEP(15))–
zFPWdwPk
at555
@@Bd8Mj
at555
zFPWdwPk'"
at555
Anonymous
at555
Anonymous
at555
zFPWdwPk
at555′”