Cinematic language has evolved tremendously since the early days of film, but many of today’s most relevant filmmaking techniques originated in classic films…
Many common visual techniques – such as the jump cut or whip pan – were first used in experimental filmmaking before eventually finding a place in mainstream cinema. Other innovations, the Dolly Zoom for instance, were developed on higher end features that had big enough budgets to achieve technical precision. Some techniques evolved organically over time, while others were pioneered by visionary auteurs for specific films, such as Spike Lee’s now classic walking dolly shot.
But it’s not just visual language that’s evolved over time, audiences have too.
The average movie goer today is highly fluent in the language of film. They intuitively understand the emotional difference between a static shot and a tracking shot… Between a wide angle closeup and a telephoto closeup. Even if they aren’t consciously thinking about it, they have seen enough films to understand how to read those visual cues, and what those directorial choices are supposed to mean.
This is incredibly powerful for us as filmmakers, as it gives us a shorthand with the audience. We can communicate our ideas more effectively than ever before, so long as we dig deep into our toolbox and use the right tools.
So with that in mind, today I want to explore 7 of my favorite visual tools and techniques.
Each of the following have been part of the cinematic vernacular for years, and continue to resonate with audiences of virtually every genre.
In no particular order –
TRACK-IN/TILT UP
Arguably the best way to convey a character’s newfound sense of power… The technique effectively combines two other shot styles (the dolly forward and the upward tilt), fusing them together to convey a powerful statement.
Simply dollying towards a character tells the audience a lot on it’s own – notably who the scene is now about…
For instance, imagine a scene focused on a group of 6 people having dinner together. By pushing in towards one of the characters as an important line dialogue of dialogue is spoken, that character’s importance (or the significance of the line to them) is magnified.
Similarly, a tilt-up in that scenario would also tell us a lot about the character.
If 5 out of 6 people at the table are shot straight on, but one of them is shot from just below, with the camera tilted up slightly, it will make them feel more powerful than the others.

Merging these two techniques together though – by pushing into the character, while simultaneously tilting up – not only gives us a sense of that character’s importance, but also their power… And combined with effective blocking, it can create a truly bold moment.
For example, in the scene described above, imagine the camera is dollying in to one specific character on a pivotal line, and as the line finishes the character stands up. Since they’re now standing, the tilt up to their face is going to be much more dramatic (a more extreme angle), and will give a major sense of change in the scene, signifying the shift in power more dramatically.
Many directors, notably Steven Spielberg, have used this technique for years, but it still seems as fresh today as ever before. It’s a very simple move, but used during the right moments it can pack a lot of punch.
MINOR OFF-SPEED
Filmmakers today have a tendency to go off the rails when it comes to slow motion, as many seem to have a mantra that slower is better. While there are certain circumstances where shooting at 120fps (or even 2000fps on a true high speed camera) can yield some incredible results, often times less is more.
Some directors like to highlight key shots by just barely over-cranking, and shooting at a marginally higher frame rate. 36fps is a common choice, as when it’s played back at 24fps, it has just enough of a slow motion feel that you can sense it, but not enough that it’s obvious to the average viewer. Shooting at 48fps for instance, would create a more more noticeable slow motion effect, as the footage would then be playing back at half-speed.
Certainly there are films or scenes that call for extreme slow motion, but in many instances, over-done slow motion can actually take the viewer out of a scene – Particularly if it’s just being used for a single shot. Cutting from standard motion to noticeable slow motion and then back again, without using speed ramps or other transitional shots can be quite jarring. 36fps, or other slightly over-cranked frame rates (such as 30fps), cut a lot better with standard 24fps material, and keep the viewer in the moment while still creating a dreamy atmosphere.
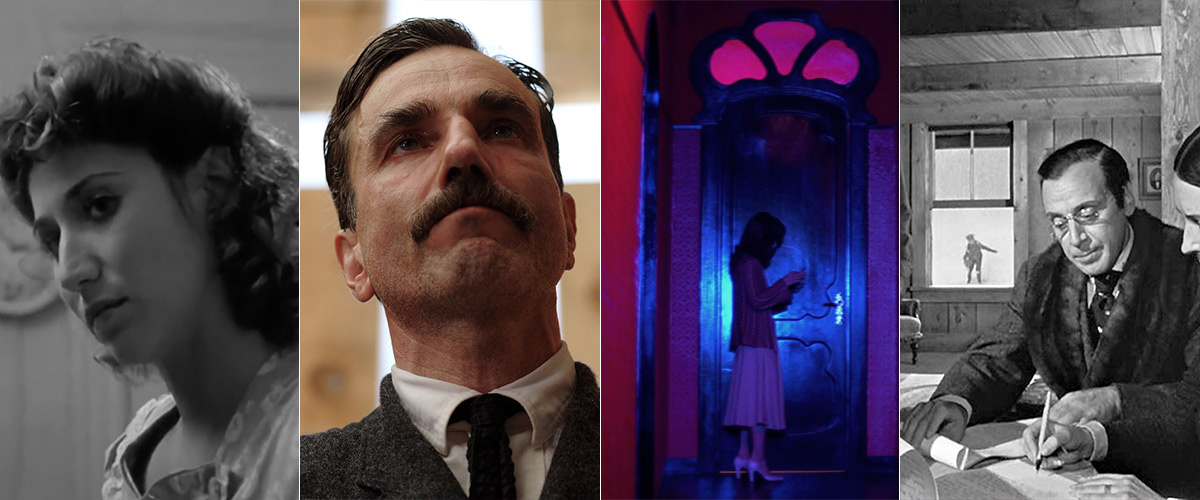
Many directors are known to slightly over-crank their footage, including Martin Scorsese, who talks about his use of minor slow motion in his latest Masterclass. Here’s a screen grab of one his slow motion shots from Raging Bull –

The same logic applies to under cranking as well. For a fast paced scene, many directors/DPs will opt to shoot at 22fps or even 20fps instead of 24fps. Played back at regular speed, it can produce a pretty amazing effect, that’s just subtle enough that you might not even notice.
CHARACTERS LEAVING THE FRAME
Our instinct as filmmakers is almost always to show whatever action is on screen. As an example – If we’re watching a character pacing around a room, it can feel intuitive to follow that character (whether handheld or by panning on a tripod) as they move back and forth. 99% of the time, that’s what most directors would choose to do.
But there’s also the option to not follow the character at all. In the same scene just described, imagine now the camera is locked off on a tripod, pointed straight into the center of the room. Perhaps the far left side and far right side of the room are not visible in the frame, but the center is. If this same character is pacing back and forth, we are only going to see him/her in little bursts. There may be a moment where the character leans against the far left well, and we have totally lost them visually… We will still be able to hear them, and sense their presence in the scene, but the room will appear empty.
From a stylistic point of view, this choice is very clinical, or omniscient by default. Unlike a tracking shot that may follow a character from behind their head (and create a very empathetic POV, placing the audience in the character’s shoes), this technique does the opposite. It positions the audience as a fly on the wall, allowing them to objectively observe the scene from a distance, in a metaphorical sense.
This is an example from Jean Luc Godard’s Hail Mary –

Countless directors, from Gus Van Sant to Sofia Coppola to Woody Allen have used this technique in their films, and have done so very effectively. Personally, I find it works best when used throughout a film, as opposed to just a single shot or scene. It also is a nice compliment to films that only use natural sound (no original score or music other than what’s playing in the scene), as both the use of simple visuals and organic sound create a highly objective point of view.
THE DUTCH TILT
This of course is of the oldest tricks in the book, but still as effective as ever…
We are trained to film everything with a straight horizon line, as that’s how the human eye sees. We don’t walk around viewing the world around us with our heads tilted off to the side, so why would we ever want to watch a film with a slanted perspective?
For the most part, we don’t. It can be disorienting or even nauseating to watch footage that was shot with a lopsided horizon. This is especially true of moving shots, as a camera pan will exaggerate a skewed/tilted angle even more than it already is.
But sometimes making the audience feel uncomfortable or off-kilter is the whole point. Genre films – specifically horror – have used the dutch tilt for decades to instill a sense of disarray in the viewer, often as tension in the story is escalating to a boiling point. The technique originated in the 1920 horror picture The Cabinet of Dr. Caligari, and has been used in countless genre films since.
It’s not just a tool for horror films though… It can effectively be used in any genre, including drama, where it will take on a slightly different meaning to the viewer. It will always create a feeling of uneasiness, but as you might imagine, it will have a far more subtle effect when used within the context of a family drama, for instance. A combination of the angle itself, and the overall tone of the film will ultimately dictate the intensity of its effect on the viewer.

While the Dutch Tilt (or Dutch Angle) can be an extremely powerful tool, it is usually only employed on a select few shots in any given film. Using it too often can diminish it’s effect on the audience, and ultimately take away it’s power to punch up specific moments or scenes for the viewer.
DEEP DEPTH OF FIELD
Although shallow depth of field has largely become the default shooting style for filmmakers today (especially those that came up through the DSLR revolution), deep DOF can be a far more effective choice when used in the right context.
Ultra-shallow DOF used to be a stylistic technique that was primarily used for dramatic effect – for example to show a character drifting in and out of consciousness. But lately, thanks (or no thanks!) to DSLRs and large sensor cinema cameras, it’s become so overdone that it no longer packs the emotional punch it once did.
Deep depth of field on the other hand, might be more effective than ever as it’s so rare in modern cinema. With more of the frame in focus, deep DOF draws attention to the environment, allowing the setting to become a character unto itself. It also creates a sense of realism in the scene, giving the viewer a greater sense that they are there – and allowing them to pick up on some of the more subtle choices in the mise en scène.
Orson Wells famously shot very deep DOF in Citizen Kane, as have countless other masters over the years –

Many filmmakers today avoid shooting in deep DOF because it’s more of a challenge. More lighting is required, setup times are extended, the production design needs to be flawless, and there’s no room for error when it comes to framing…
In contrast, shooting with shallow DOF is quite easy. Throw any background out of focus and it will look pretty good. But the added challenge that deep DOF imposes on a shoot is a good thing. Working through a more difficult shoot (while unpleasant) often generates better creative results, as more specific choices need to be made, and attention to detail is non-negotiable.
TELEPHOTO ACTION SHOT
Another technique we don’t see quite as much as we used to, is the telephoto action shot.
Before the advent of the Steadicam, there was no easy way to capture run and gun tracking shots that follow actors moving at a fast pace. On occasion it was possible to use a dolly, or to simply go handheld (when film cameras got light enough), but really before the Steadicam, options for smooth shots in a fast paced scene were highly limited.
For that reason, filmmakers like Akira Kurosawa would often use a long, telephoto lens on their cameras and shoot their action scenes from a distance. This would not only allow them to track the movement over a larger distance, but would also create far more intensity and chaotic motion within each shot.

On a long lens, such as a 120mm for instance, even a small pan of the camera is going to result in loads of movement in the background. This exaggerated motion compliments action sequences beautifully, especially when compared to normal (or wide) lenses, which slow the pace down considerably when shooting from a tripod.
Today, thanks to the Steadicam (and gimbals of course), many filmmakers opt to shoot on a wide lens, place their cameras close to the talent, and physically run after them during an action scene. This can work well, but it’s important to remember it’s not the only option we have. In some cases, going a bit more old school, stepping back, and shooting the action from afar can produce more unique results, while simplifying the production requirements at the same time.
STARK COLOR CONTRAST
Since the early days of color photography, the best cinematographers would always look for ways to add color contrast to their images. As I talk about in my Color Grading Masterclass, color contrast is extremely pleasing to the human eye, and can only exist when two opposing colors together – such as red and blue – are paired in the same frame.
Before color grading became as advanced as it is today, color contrast was largely achieved in camera by using color gels or bulbs to mix up the color temperature in a scene.
Recently, I re-watched the original Suspiria (1977), and couldn’t get over the gorgeous use of color contrast which added so much to the tone of the film –

For a while, color contrast seemed to vanish a little bit from the language of indie film… In particular, when the milky black look started to take over a few years ago, many filmmakers were opting for a more washy color palette, which unfortunately resulted in images with little color contrast.
But finally, it seems like more independent filmmakers are seeking out ways to use color to effectively shape the tone of their films, and as part of that, color contrast seems to have made it back into the discussion.
The notion of color contrast can apply to every genre, but how it’s used is often genre dependent. For example, a horror film may use Red/Blue, an action film Teal/Orange, or a sci-fi Green/Purple. Color has such a strong psychological effect on the human brain, so if we aren’t always looking for ways to emphasize our color palettes – whether through lighting or Color Grading LUTs – we are missing a major opportunity.
FINAL THOUGHTS
The 7 techniques I’ve listed above represent just a handful of the tools we all have access to as filmmakers. Not every film needs to use all of these techniques (or any of them for that matter), but it’s important to understand the meaning of them, and what they convey to the audience, in order to know when to use them.
I came up with this list after watching countless classic films over the past two weeks. There’s nothing more inspiring than re-watching films that truly broke new ground, and helped to shape the visual language of cinema as we know it today. There countless other visual techniques/references I could have added to this list, but there is only so much I can fit into one article.
For those of you that want to continue to build up your visual toolkit, start by watching the work of the masters. In particular, filmmakers like Stanley Kubrick, Orson Wells, Jean Luc Godard, Steven Spielberg, Federico Fellini – and any other directors and cinematographers that broke new ground. If you discover some techniques you like, let me know in the comments below!
And for more content like this, be sure to follow me on Instagram, Facebook, and Twitter!


12 Comments
7 основополагающих элементов киноязыка, которые важны до сих пор -
at[…] Источник: noamkroll.com […]
Poker Stuff - Beat Your Challengers And Win The Overall Game - Australia Assessments
at[…] been called a casino game of ability as you can call bluffs as well as bluff oneself. It requires a tremendously high amount of skill to behave in addition to see bluffs which is also necessary to discover and […]
Task 1/3 – Theoretical Research (Secondary) – How to make an audience uncomfortable – Peaceful Friend
at[…] [Accessed 6 April 2020]. Kroll, N., 2018. Noam Kroll. [Online] Available at: https://noamkroll.com/7-old-school-filmmaking-techniques-that-still-define-modern-cinematic-language… [Accessed 6 April 2020]. Porter, S., 2019. The Beat. [Online] Available at: […]
Best Point and Shoot Camera with Flip Screen for Vloggers | April 2020 Updated
at[…] there, it basically allows you to store images, videos, and audios in electronic memory leaving the traditional film method […]
AOTG.com - Post Production News, Websites, Articles, Videos, Blogs & More! For Film and Video, Editing, VFX, Sound, Colour, and Animation
at[…] http://noamkroll.com/7-old-school-filmmaking-techn… […]
Carey Martin
atI was referred here by Michael Wiese Productions Fb page, and I’m very glad I was. May I share this with my students?
Noam Kroll
atOf course! Please do.
Jonathan
atI’m really happy to see this article. I’m one of the old school guys and these techniques are instinctive to us …. I always enjoy when cinema heads off the beaten path to explore and learn new things and brings all of that new goodness to the original foundation…
Thanks for the article
Noam Kroll
atAppreciate it very much, Jonathan! Thank you.
Daniel Kunz
atNoam, these kinds of posts are truly a standout from all these “7 Gadgets you absolutely need for your next production”-kind of posts that we see around. Thank you for doing this work!
Noam Kroll
atMy pleasure, Daniel! Thanks for taking the time to read.
Simon Bolz
atYes, very interesting and good. The one with the character leaving the frame really inspired me, I will try this out in one of my future clips. Thanks for this idea!
Noam Kroll
atNo problem, Simon! Thanks for reading.
B
atInteresting. Really enjoyed this read.
Harshaan
atWonderful read. Many thanks, Noam!
Characters leaving the frame and Stark color contrast were my favorites.
Noam Kroll
atAwesome – two of my favorites as well…
Noam Kroll
atThanks so much!