The use of Look Up Tables (or LUTs) has absolutely exploded over the last few years, largely thanks to the abundance of new cameras that shoot in Log color space. It wasn’t long ago that you would be hard pressed to find anyone that even knew what a LUT was outside of a high end colorist, but today they are used even by nearly every filmmaker in one way or another – even film students.
This is a great trend to see, as LUTs offer an extremely powerful and efficient way to manage your color pipeline. From using LUTs with your on board monitoring system to preview looks on set, to integrating them into your post-workflow, a well crafted LUT can increase the speed and quality of just about any production when used right.
Most commonly, LUTs are used to translate video files into a different color space. So for instance if you were to shoot a clip in Log color space (which is very flat), you might use a LUT to convert the image to Rec. 709 space, where it will have more contrast and saturation, and will look more reminiscent of your intended final look.
LUTs are also commonly used as “filters”, as a means to quickly apply a new style or look to footage without having to create a new grade from scratch. Since LUT files can be universally used across many editing and color software platforms, they offer a lot of value for visual filmmakers with all sorts of different needs and workflow setups.
Personally speaking, I create custom LUTs constantly, and for a wide variety of reasons. I’ll often use them on set to preview different looks for clients, or will send them off to offline editors I collaborate with so that even their rough cuts will have a more polished look to them.
Creating LUTs is a very simple process for the most part, and generally involves three steps:
1. Prepping & balancing your source footage
2. Making color adjustments
3. Exporting the LUT
These steps can easily be executed in just about any color software or editing program that supports the exporting of LUT files. But for the purpose of this article, I really want to focus on point 1 –
PREPPING YOUR SOURCE FOOTAGE
The number one mistake that people make when creating a LUT is neglecting to first prep their source footage. It’s common for a filmmaker to bring their source footage straight into their color software, create a look, and export the LUT file without having first prepped their image properly. This can cause some major issues down the line when using the LUT on different clips. Here’s a quick example –
Say for instance you shot an image at the wrong white balance. If you were to craft a look around that image (and balance the color in the process), your generated LUT would not work on the vast majority of footage that you shoot. The drastic white balance adjustment that you would have made to the footage will be baked into the LUT, and it will then be applied to every clip you use the LUT with, even if the clip doesn’t have a white balance issue. Making this kind of mistake would obviously result in a pretty terrible looking final image.
This is an obvious example, but the same kind of issue can occur even if you nailed your white balance on set. Issues with exposure, lighting, or camera settings can all have a detrimental impact on the LUT building process.
The key with creating a LUT is to use the most neutral image possible as your starting point. You want your exposure to be perfect, your white balance to be exact, and your lighting to reflect an accurate and natural amount of shadows and highlights in the image. By working from a neutral starting point, you will ultimately be able to create a LUT that will be far more universal, and can be used across a wide variety of footage.
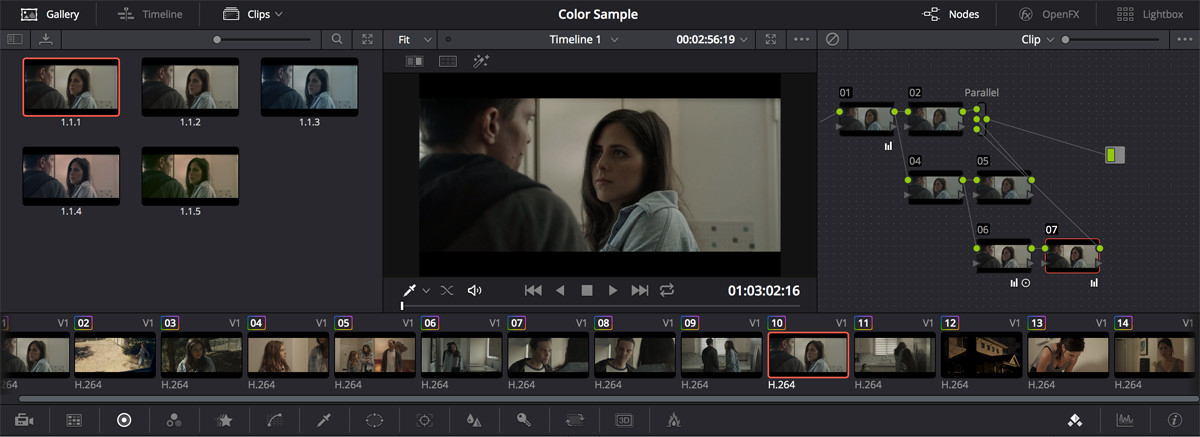
In order to get your image to this neutral starting point, you essentially need to pre-color your footage before adding the color adjustments that will later become your LUT. In other words, you want to start your process by creating a single layer or node that will “fix” any technical issues with your footage first, and then on separate layers or nodes, create the actual look.
Once your image is looking just right, you can go ahead and delete your very first layer or node (since it is highly specific to the clip you are working on), and then use your software to export the LUT using the remaining color adjustments.
It’s worth noting that using a color chart on set is probably the best way to ensure you will achieve perfect results during this process, and in a future article I’ll be sure to outline color charts in more detail.
My preferred software to create LUTs with is DaVinci Resolve, but if you aren’t a Resolve user or ever find yourself in a pinch, you can even use Adobe Photoshop to generate a LUT.
Here is how you can create a LUT in Adobe Photoshop in a few very easy steps:
Step 1 – Import source footage
Obviously in Photoshop you aren’t going to import your entire video file, but you can import one of the RAW frames (if you’re shooting in a RAW image sequence format), or alternatively you can export a TIFF image from your editing software if you shot in a compressed format. From there, simply bring the image into Photoshop as a new file.
Step 2 – Create an adjustment layer & get to work
Once you have a still from your video file loaded into Photoshop, you will want to create an adjustment layer directly above your source file. You will use this layer to make any contrast/curves/color adjustments to your image as you see fit.
Step 3 – Export the LUT
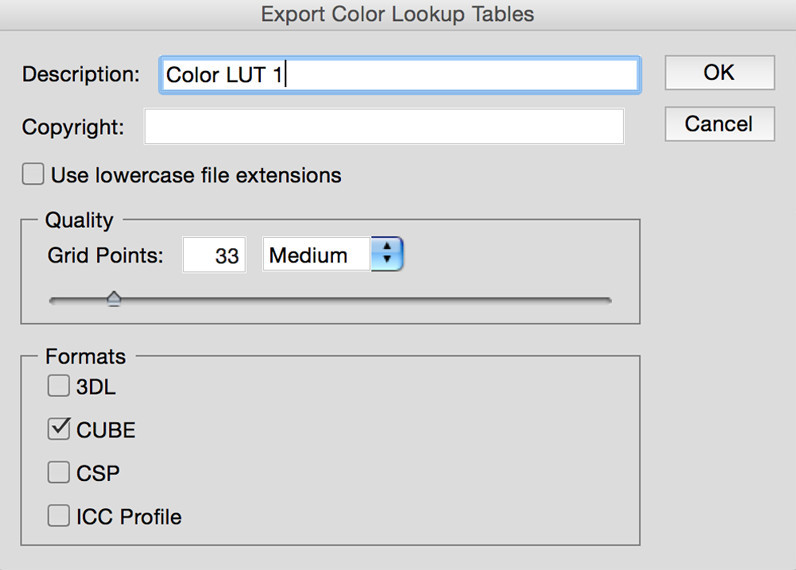
To save the LUT, all you need to do is select your adjustment layer and select File > Export > Color Look Up Tables. This will bring up a settings window that will allow you to customize the export settings of your LUT to your liking.

That’s about it for now! Hopefully you’ve learned a thing or two about LUTs and how you can streamline your process for generating them on your own.
For all of you A7S II users out there, here is a custom S-Log 3 LUT I made available for free.
Let us know if you have any other tips or questions about creating LUTs in the comments section below.


9 Comments
Felipe
atGreat article, did you come across any information as to the color profile workflow with Photoshop. In a wide gamut monitor, should one use Adobe RGB when exporting LUTs (Lookup Tables)?
Zack Stephen
atFantastic article! Been trying to find articles about LUT creation. One of the better ones out there.
Would love to see a follow up article as you said about color charts! How to shoot, expose, light for them to get a good result in prep?
Would also love to see some articles about monitor calibration and display LUTs.
Noam Kroll
atGreat ideas, Zack. Thanks for sharing this – I’ll aim to cover these topics in future articles.
Zach
atPerfect article to stumble upon in my time of color crisis. Thanks so much for the insight and workflow 🙂
I am curios about how far you push your footage during the prep and balance stage. Do you have a standard contrast or black/white level that you like to achieve before working on your LUT or do you only allow the LUT to affect color?
Noam Kroll
atThanks Zach! To answer your question – I try to go as neutral as possible during color prep. I like to get my black levels right at 0 for every shot. That way everything has a consistent look to it, and nothing feels too crushed or lifted. From there, I can either add or reduce contrast manually, or with a LUT depending on the workflow I’m using at the time.
Kai Liu(The food photographer in New York)
atThis is important. Thanks.
I always say why buy those luts if you can create even better luts for free on yourself.
Those luts you bought still need tweak in post to match your footage. so why not just create your own.
Noam Kroll
atVery true! Creating your own LUTs is always the way to go, as long as you know what you’re doing. Thanks for the note.
Steve M.
atWould love to see a video tutorial on this “Making a LUT” in DaVinci Resolve 12.
Noam Kroll
atWill certainly keep this in mind for a future post!