As I outlined in this previous post, I recently wrapped production on a feature film and will be continually documenting our process here on my blog. For today’s installment, I’m going to focus on one of the biggest challenges that we faced during production – moving car scenes.
Shooting a dialogue scene inside a moving vehicle is never easy, and it’s especially tough when you’re working on a tight (or non existent) budget. On a full scale feature film with a large budget, you can block off roads, use rigging to mount cameras to the hood of the car, use a process trailer to allow the actors to focus on acting (and not driving), or shoot everything on a soundstage to make things easy.
Micro budget productions on the other hand can’t afford any of these luxuries, so other techniques need to be employed in order to get the shot without sacrificing quality or safety.
It can be extremely difficult to operate a handheld camera from inside a moving vehicle, let alone pull focus, change camera settings, swap filters, or make any other adjustments on the fly. You could of course not shoot from inside the car (and mount the camera to the hood). However that’s generally a bad idea if you are not permitted, since it will draw a ton of attention and potentially cause safety issues for your actors, as they will need to drive with an obstructed view of the road.
Not to mention, sound poses it’s own set of challenges… Even with carefully planted mics inside the vehicle, a moving car is always going to sound like a moving car. While some post-audio work may be able to minimize engine sounds, rumbling and other road noises, the end result will never be perfect.
Add to all of this the difficulties associated with directing your actors in a car scene (if you aren’t also operating your own camera) and you have a whole other slew of problems. For these reasons and more, many micro budget productions have no choice but to use some out of the box techniques or “hacks” to get around these issues.
One of the most common workarounds involves shooting on a green screen, which can work well, although it’s not an option that I considered for this project. This method simply involves placing a green screen behind any windows in the car, and replacing it in post with a background plate of moving road footage.
Personally, I’m not a big fan of green screen shots – not because they can’t look great (they certainly can), but usually because those type of VFX shots don’t often fit the aesthetic that I am going for. I tend to lean toward real, organic, natural looking footage, and I can always tell when a car scene has been shot using a green screen, even on large productions. With that in mind, I knew right off the bat that green screening the driving shots wouldn’t be an option for this particular film.
At the same time, I knew I desperately had to figure something out as this feature is in the “road movie” genre, which meant there were loads of driving scenes that would need to be captured throughout production. Before we started shooting, I actually re-worked a number of scenes that were originally intended to take place in the van, so that they could instead be set in a different environment (at a rest stop, hotel, etc.). This took some of the pressure off, while also diversifying the look of the film… But that didn’t take away from the fact that there were still numerous dialogue scenes on the road that needed to get figured out, and quickly.
The first option that I considered involved rigging our camera inside the van. We rented an old VW Camper van for the shoot, which had a decent amount of room inside and could have theoretically allowed for the camera to be mounted to the window, floor, or roof.
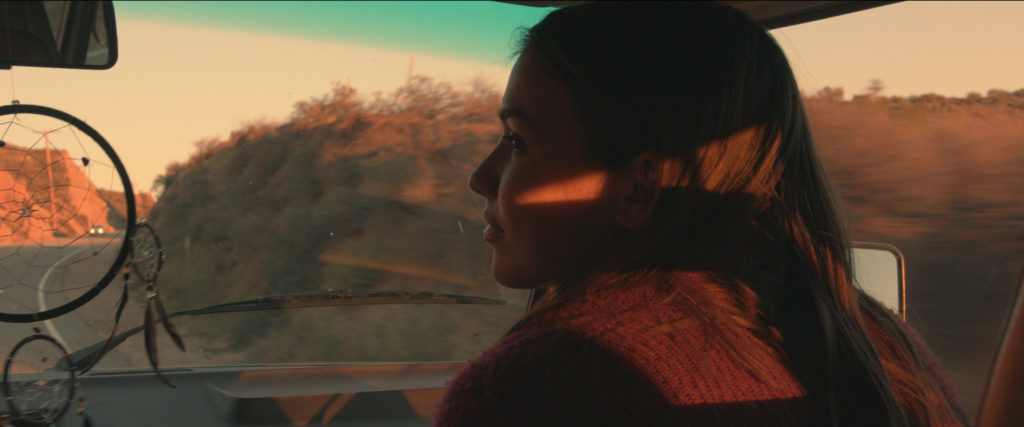
Below is a screen grab from the film, showing the van in the distance:

On a side note: If you have never shot in a car before, you should know that if your camera is tightly rigged/bolted to the body of the car, you will get perfectly stable shots. Even if the car is driving down a bumpy road, your camera will move in unison with the car, and will capture perfectly steady shots since it isn’t floating on a handheld rig, or bouncing up and down on a rocky tripod. Many filmmakers don’t realize this, and think that shooting handheld will actually help the camera absorb the bumps, but it actually can make the bumps a lot worse.
In our case, rigging inside the car made a lot of sense from a practical standpoint, but the more I considered it, the less I wanted to move ahead with that plan. While it would have been relatively cheap and easy to buy some suction mounts and rig the camera inside, that wasn’t the look I was going for. Most of the film is shot handheld, with only a few specific scenes shot on a tripod in order to evoke a different mood. Using a rig inside the van would definitely have allowed us to capture steady shots, but that look wouldn’t have been appropriate for those scenes. For that reason (as well as some safety concerns that I had about the rigging option), the idea of mounting the camera inside the van was nixed pretty early on.
Another option was to simply shoot handheld from the back seat (and embrace the bumpiness), however this would have been really difficult to execute, the sound would have taken a big hit, and the safety issue would still be there.
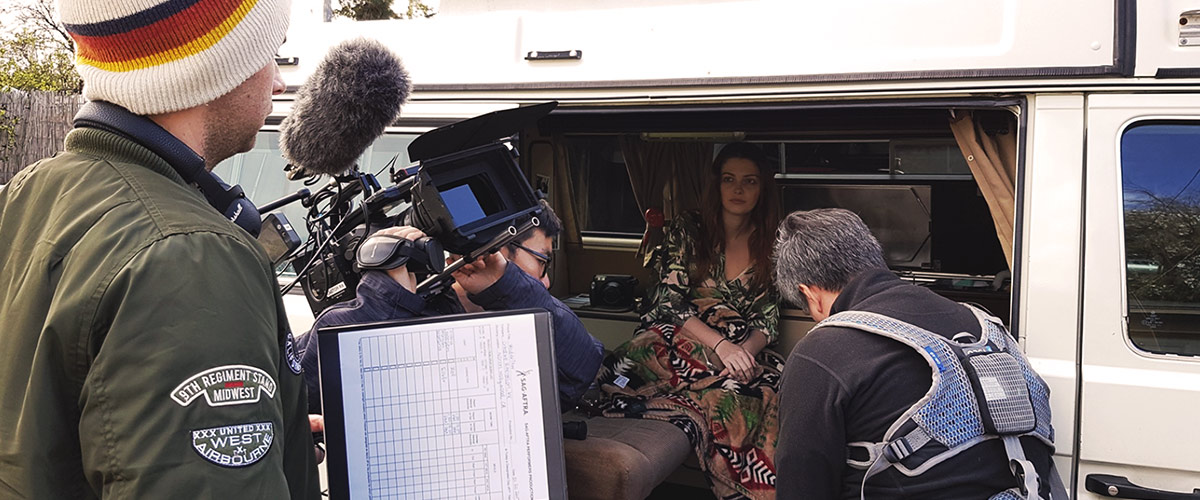
So at this point I knew there was only one option – a poor man’s process trailer. And by “process trailer” I mean the camera pointed through the front windshield while the van was stopped.

By shooting straight through the front windshield (with a polarizer to cut reflections) and having one of our crew members rock the van from side to side, we were able to capture several driving scenes without doing any actual driving. This solved so many issues. It allowed the actors to work freely (and safely) without having to worry about navigating the road, it enhanced our image and sound quality dramatically, and it gave us a unique perspective through the windshield that wouldn’t have otherwise been possible.
We were lucky in that the van we rented had a curtain on the back windshield, so even though we were shooting through the front, you couldn’t see what was behind the van… So there was nothing to give away the fact that the van wasn’t actually moving. In some cases, we had to be careful about reflections on the front windshield, because their lack of movement would of course give away the fact that we weren’t driving. To combat this, we simply relied on our polarizer to cut the glare and parked the van in a spot where it wouldn’t catch a lot of reflections to begin with.

For night shots, it was even easier to pull this off since the background falls off to black. This meant we could get even wider with our shot size, and see out the side windows too without giving away the fact that we weren’t moving.
If the night scenes were supposed to take place in a city, we would have needed to use some LED panels or other lighting off to the side (and behind) the van to simulate the look of traffic lights and other cars on the road. In this case though, the characters were supposed to be driving down a dark desert road, so we didn’t need to add any additional lighting.
The night scenes were largely shot around blue hour (right after sunset). This gave the actors a really nice, natural light on their faces that had an organic looking coolness to it. This also of course meant that we had to shoot these scenes very quickly – but with enough rehearsal time beforehand, it wasn’t a problem at all.
So when all was said and done, we were able to capture some really beautiful driving shots without having to do very much real driving… All the while leaving more room to work with the actors, experiment with framing, improve our audio quality, and so on.
We also shot through the window on some car scenes where the vehicle was supposed to be parked, so that the look would be consistent:

We did of course need to shoot some real driving shots from inside the van so they could be intercut with the dialogue that was shot through the window. But being able to rely more heavily on the footage shot through the window, meant we could simply shoot b-roll from the back seat and film the actors driving down the road, just as they would if we weren’t filming at all.


In the end, the choice to work this way enhanced our driving scenes dramatically. Had we risked shooting all of these scenes in the car while actually driving, the quality would have taken a major hit in every way.
That’s about it for now! I will be sure to share some edited material from these scenes, and loads of other content over the coming weeks, so stay tuned…
Be sure to follow me on Instagram, Facebook, and Twitter for more updates as things progress!


13 Comments
How To Shoot A Moving Car Scene With No Process Trailer, Rigging – SUPER LIVESTREAMERS CLUB
at[…] https://noamkroll.com/how-to-shoot-a-moving-car-scene-with-no-process-trailer-rigging-or-budget/ […]
Cade
atI’ve shot through the windscreen of a moving car from inside the car using a camera on a stabilizer with no shake. It really depends on the road. In major cities the roads tend to be quite even. So, shooting from inside a moving vehicle is not a big deal unless you’re shooting on a bumpy road. I think your piece gives the impression filming on ANY road is problematic and that’s a bit misleading and could put off those who intend to film on even roads.
.
Angad Singh
atHey Noam, thanks for this. Really helpful. I’m in the process of storyboarding my road movie . The film is an indie micro budget film, so this was particularly helpful.. . Made my boarding more exact and in fact made me cover more with lesser shots. I had a question – did you also take shots from the driver’s window and passenger’s window. Was it done with the trailer or while actually driving? Thanks again!
Noam Kroll
atCongrats on getting your film off the ground, Angad. In our case, we didn’t have a trailer and didn’t get any shots through the side windows – just the front windshield using our “poor mans process”.
Brianna Sadler
atBeautiful work! What type of camera/polarizer did you use?
Noam Kroll
atThank you, Brianna! It was shot on the URSA Mini Pro, but I can’t remember which pola we had used…
Smart Joseph
atHey Noam,
Thank you so much for this piece, I have also been battling with how to go about my project which involves driving also (95% driving production) I must say that this article has given me an insight to what i could do.
Thank you once again.
Smart Joseph
Noam Kroll
atSo glad to hear it! Hope it goes well.
Peer
atWhere can we see the result?
Noam Kroll
atSoon! The film will be released this summer.
Project 3: Research – Filming in a moving vehicle – Oli Braybrook
at[…] Moving Car Scene With No Process Trailer, Rigging, Or Budget. [online] Noamkroll.com. Available at: http://noamkroll.com/how-to-shoot-a-moving-car-scene-with-no-process-trailer-rigging-or-budget/ [Accessed 13 Jan. […]
Patrick Monaghan
atAwesome ideas in this post. What set up did you end up going with for the shots inside the car?? Mounting or hand-held?
Noam Kroll
atThanks Patrick! Everything inside the car was handheld. We ended up shooting a lot of it in slow motion which helped, and for the real time footage we kept it on a wide angle so the bumps wouldn’t be as noticeable
Kim
atWill be interesting to see the results. I was doing some testing last summer as related to 360 video, but in lack of the cameras and lenses at this time with only one camera, and did not much use time for the installation 🙂 https://vimeo.com/176335139/8f06e4bfae
Noam Kroll
atThanks for sharing this Kim!